
CSP - 003 - Layers - Part 1: Overview
As in many other programmes, work in CSP is organised in layers.
They can be imagined as transparent sheets placed one on top of the other, on which you can go to draw, colour, insert guide lines etc.
All layers can be made visible or not on the Canvas: if there is an eye next to the layer thumbnail, the layer is visible; if there is not, the layer is not visible. If you click on the eye, you 'turn off' the layer'; if you click where it should be, you 'turn it on'. Layer visibility also means, in many ways, the possibility of operating in the layer itself.
Fig. 1 - There is the eye: layer is visble Fig. 2 - There isn't the eye: layer is not visible
The editable layer (i.e. the one we are using) is marked with a pencil symbol  . In other versions this symbol looks like a penknife (actually I think it is a fountain pen)
Draft layer
A layer can be set as a Draft layer. When a layer is Draft, then certain actions can be performed by ignoring it, such as setting references for selections. In a nutshell, if you set a layer as Draft, you can if necessary make a selection that takes into account the contents of all layers except the Draft, which is then only a construction layer of the design.
Similarly, when exporting a drawing you can exclude the export of the Draft layer: you see it on the Canvas on which you drew but not in the exported file.
There can be more than one Draft level.
I generally set as Draft the layer with the "pencils", i.e. the drawing that has not yet been inked. I often (especially if I have not already made the drawing with a blue pencil) change the colour of the layer content by clicking on the Change layer colour icon, in the Property bar of the Layer palette, which by default is set to cyan (it goes without saying that this colour can also be customised).
To set a layer as Draft go to Layer > Layer Setting > Set as Draft Layer, or click, in the Property bar of the Layer palette, on the icon with the pencil Set as Draft Layer Several layers can be set as Reference layers at the same time, simply select them (CTRL + click on individual layers, or Shift + click on the first and last of a series of successive layers) and click on the lighthouse icon in the Property bar of the Layer palette. . A blue bar appears next to the thumbnail and the pencil symbol on the right-hand side of the layer.
Fig. 3 - Draft layer
Reference layer
A layer can be set as Reference layer. A layer set as Reference can act as a reference for certain tools or selections. For example, I can make a selection made on one layer actually consider the contents of other layers as a boundary. This is useful when making fills, for example, where you work on one layer but refer to the lines on another, the Reference precisely.
A lighthouse icon appears in the Reference layer next to the layer thumbnail  .
.
To set a layer as Reference go to Layer > Layer Setting > Set as Reference Layer, or click on the icon with the lighthouse Set as Reference Layer in the Property bar of the Layer palette.
Several layers can be set as Reference layers at the same time, simply select them (CTRL + click on individual layers, or Shift + click on the first and last of a series of successive layers) and click on the lighthouse icon in the Property bar of the Layer palette.
Raster and vector layers
In CSP it is possible to draw on two types of layer: raster and vector.
If you draw two lines, one on a vector layer and one on a raster layer, they are similar [I drew the line in vector here, duplicated the layer and converted the copy to raster, so they are exactly the same]:
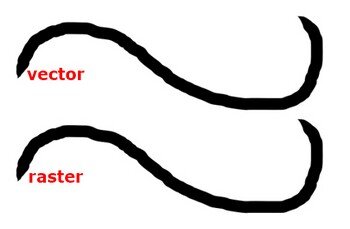
Fig. 4
By zooming in on the drawing, we can see that at a certain point the two lines crumble:
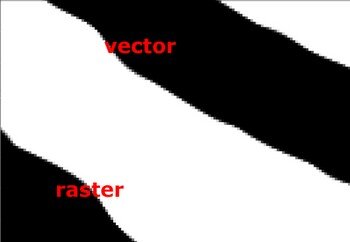
Fig. 5
This happens when you have zoomed in so much as to reveal the grid of pixels on which the image is built [see also Massimo Borri's reply to this post (in Italian): "...CSP is a raster (or bitmap, in short, pixel-based) graphics programme and the "vector" layers only contain the brush paths used, then the pixels are drawn anyway (as many or as few as the resolution of the work)..."].
Zoom back in and enlarge the two lines in a 'physical' manner this time, i.e. by actually changing their size.
To do this, for the vector layer create a selection around the line (actually for vector layers you could use the Operation > Object tool, tap on the line and drag a corner of the envelope rectangle that appears, but it also works with the selection), then go to Edit > Transform > Scale and while holding down the Shift key (so as not to change the proportions) drag the selection by one corner until you've enlarged it properly. CTRL+D to delete the selection and do the same for the line on the raster layer (in this case you can only enlarge by first creating the selection because the Object tool does not act on raster layer lines).
Returning then to look at a small area with the zoom (Fig. 6), you can see how the vector line is not at all different from before it was 'physically' enlarged, while the appearance of the raster line has definitely deteriorated, losing definition.
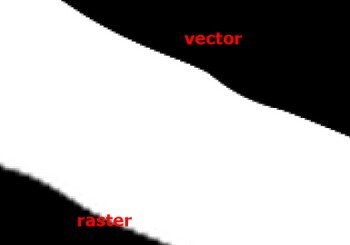
Fig. 6
Explained roughly, the vector line is defined by mathematical functions that tell the programme how to reconstruct it at each 'physical' magnification. The vector layer basically stores not so much the image of the line as you have drawn it, but how to change the properties of the line between various key points each time you enlarge (or shrink) it. The quality of the line remains optimal.
The raster line, once drawn, that is. If you want to 'physically' enlarge it, you have to do so with what you have: this means that, as you enlarge, you add space between the points whose properties the programme knows. In the space created between these points the programme has to 'invent' what to put, and so it interpolates the properties of the known points, creating new 'filler' points with arbitrary properties, more or less effectively. This creates what is known as pixellation, which is why the quality deteriorates.
Of a vector line, the programme knows the properties of certain points and the relationships between one point and another, i.e. it has a set of "... instructions and parameters for drawing the final image, element by element, from geometric primitives such as lines, curves, polygons..."(see here, in Italian). If you enlarge the line, the instructions for drawing it remain the same, only the scale at which it is to be drawn varies. All this information is recorded in terms of mathematical functions and the programme does not have to store the data every single pixel of the image. At any size and resolution, the line is redrawn optimally, without loss of definition.A raster image is a grid of points (pixels), each with certain colour and brightness values; drawing a line in raster defines the properties of the various pixels that make it up. Once established, they apply to the image as it was created, i.e. for that size and resolution. If you enlarge the image, new pixels are introduced that have no information about what properties they should have, and the software somehow creates them from scratch based on what is around them. The missing information is interpolated, more or less well: it is at this point that the pixelations are created.
CSP does not work purely with vector, e.g. it does not allow vector filling of closed shapes from vector lines. That is, it is not possible to draw a coloured surface in a vector layer, as Adobe Illustrator does, for example.
In CSP, fills are made using raster layers.
To add a raster layer click on the New Raster Layer icon in the Command bar of the Layer palette  (by default above the layers); to add a vector layer click on the New vector layer icon
  .
.
Use of raster layers and vector layers
Personally, I use CSP vector layers for lines, or lineart: basically, inking. Strokes made in vector are easy to manage: they are scalable (enlargeable or reducible) without loss of detail, correctable and quickly selectable. On the other hand, it is not possible to make a background (oh my, you can also fill with a vector stroke using it as a marker, but with results that in my opinion are questionable and unmanageable).
I use raster layers for everything else (and when I need effects on lineart, e.g. colour holds), although many also prefer them for lineart. A matter of taste.
Show vector paths
You can enable or disable the view of the path on which a vector path is built. Simply go to View > Show vector paths > Show vector paths on selected layers.
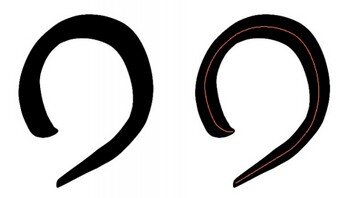
Fig. 7 – On the left the track is not visible, while on the right it is.
Other options are also possible, such as showing all paths on vector layers (Show all vector paths on vector layers); showing control points at beginning and end of the path (Show control points at beginning and end) or showing all control points on the path (Show all control points).
Layers on a new document
When a new document is created, it contains two layers by default: a layer called Paper, and a raster layer. The Paper layer is below them all, and is also the only layer that is not transparent by default. It cannot be moved from its position and cannot be placed inside a folder.
Fig. 8 - Paper layer
When creating a new file, in the New window (see next image) you can uncheck the Paper colour box (no. 15) and in doing so the Paper layer will not be created, or you can decide on a colour other than white (by clicking in box 16); the colour of the Paper layer can also be changed later. To this default situation I can add as many layers (raster or vector) as you want, depending on the need or complexity of the drawing. To add a raster or vector layer, simply click on the corresponding icon in the Command bar of the Layer palette.
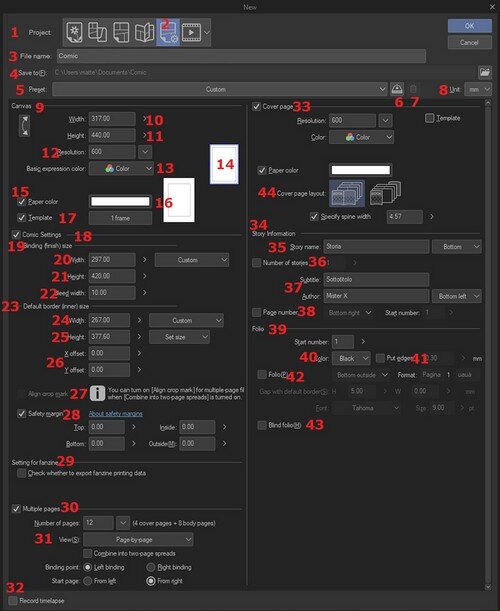
Fig. 9 – The New window
Linking layers (tick)
The layer you are working on is the one with the pencil symbol:
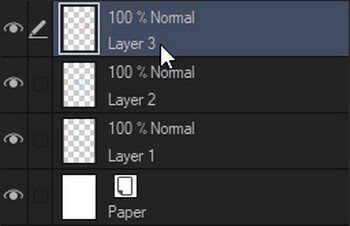
Fig. 10 – Layer you are working on
Nothing appears on the other layers in general. However, it is possible to link several layers together by touching the layers to be linked with the cursor next to the corresponding eye, causing a tick to appear:
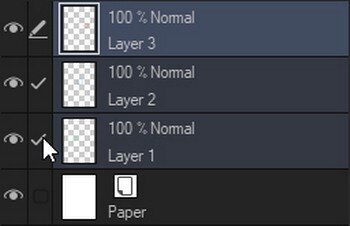
Fig. 11 – Linked layers
It is thus possible to move the content, change the transparency, apply effects etc. of all by performing these actions only on the layer with the pencil. The connection is rather tenuous: if I select a layer other than the one with the pencil, it is lost. The ticks also appear if I select several layers at once by holding down the Shift key.
Duplicate layer
To duplicate a layer I can:
- right-click on the layer and choose Duplicate Layer;- drag the layer onto the New Raster Layer icon in the Command bar of the Layer palette. This works with both raster and vector layers (resulting in raster and vector duplicates, respectively), but both layer types must be dragged onto the New Raster Layer icon (strange, but it's true);- with the Move layer tool, hold down Alt and drag the cursor on the screen;- with the layer selected, use the key combination Alt + L [it's a customized setting];- with the layer selected, go to Layer > Duplicate Layer;- from File > Command Bar Settings... extract an icon for the command, place it on the Command bar and then use it, having first selected the layer to duplicate.
Emptying a layer
You may want to delete the contents of a layer, but keep the layer itself. A quick way is to select the layer and then click the Delete icon in the Command bar  .
.
Delete a layer
Select the layer and alternatively:
- from menu Layer > Delete Layer ;- click on the trashcan icon in the Command bar of the Layer palette;- drag the layer to the trashcan in the Command bar of the Layer palette;- right click on the layer > Delete Layer.
Move layer
Nella Tool property dello strumento Move layer ci sono varie opzioni; oltre al tipo di oggetto da spostare, trovi alcune casellina di spunta:
- senza selezionare nulla nella Tool property, clicca in un punto qualsiasi del Canvas e muovi: si sposta il contenuto del livello selezionato in quel momento;- seleziona Move the object at the clicked position: indipendentemente dal livello selezionato, muovi tutto il contenuto di un livello toccandone almeno una parte (quindi non basta toccare ovunque nel Canvas, ma bisogna toccare dove c'è qualcosa di disegnato);- seleziona Move layers in the selected area: dopo aver fatto una selezione, clicca al suo interno e muovi. Si sposta il contenuto di tutti i livelli racchiuso dalla selezione, mantenendo la gerarchia tra i livelli;- in entrambi i casi, se metti la spunta anche a Moved layers become selected, allora i livelli che sono stati interessati dal movimento vengono automaticamente selezionati nella Layer palette;- se spunti sia Move the object at the clicked position che Move layers in the selected area, è come se avessi cliccato solo Move layers in the selected area.
If you move the selection with Move layers in the selected area over other parts of the design and then move the selection again, the new parts of the design are not moved: it continues to move the parts selected when the selection was created.
---
© Copyright Matteo Paolelli

0
reviews