
CSP - 002 - The Workspace

It is good to familiarise early with the programme's interface, as the explanations found around (and also mine) often refer to its various areas. It is good to remember the name of these areas, unless similar areas and commands are named after other programmes, e.g. Photoshop. Read the paragraph CLIP STUDIO PAINT Screen Configuration (from v. 1.8.0; was Screen Components in earlier versions) in the Manual or in the Startup Guide.
Below is the default diagram of the various areas in version 1.9.5. There is no caption for everything, but I would say that it is more than sufficient for beginners.
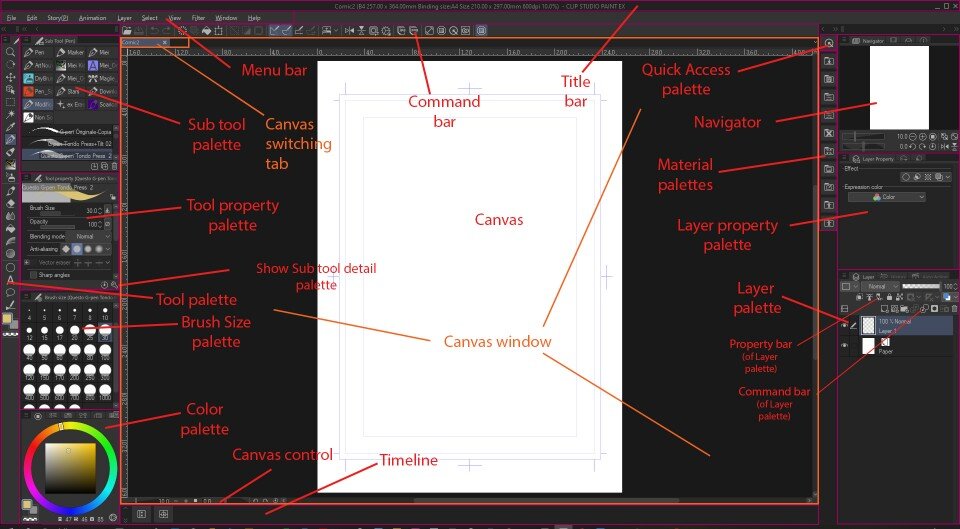
Fig. 1 - The CSP workspace
The interface is extensively customisable by moving its various parts (what in Fig. 4 are the various palettes etc.), and any rearrangements can be saved in a Workspace that can be recalled if desired.
With version 1.9.5 (December 2019), the interface has been slightly modified, introducing a different appearance and icon display.
By clicking the Tab key, the various palettes collapse, and the floating palettes disappear; by clicking it again, everything returns as before.
Workspace
As mentioned, the workspace can be customised.
Once I have adjusted it as I see fit, I can save the configuration in:
Window > Workspace > Register Workspace... and the new workspace will be added in the same window.
If I want to call up a different Workspace from the one I am working with I go to:
Window > Workspace and click on the name of the desired Workspace. It will ask me for confirmation and I give the OK.
In the same way I can reset the Workspace to its default settings; I go to:
Window > Workspace > Reset to Default.
Alternatively, start the programme while holding down the Shift key: a window will appear from which you can reset the workspace to default and more (note: any other workspaces you have registered will be deleted).
For example, this is my workspace at the time of writing:
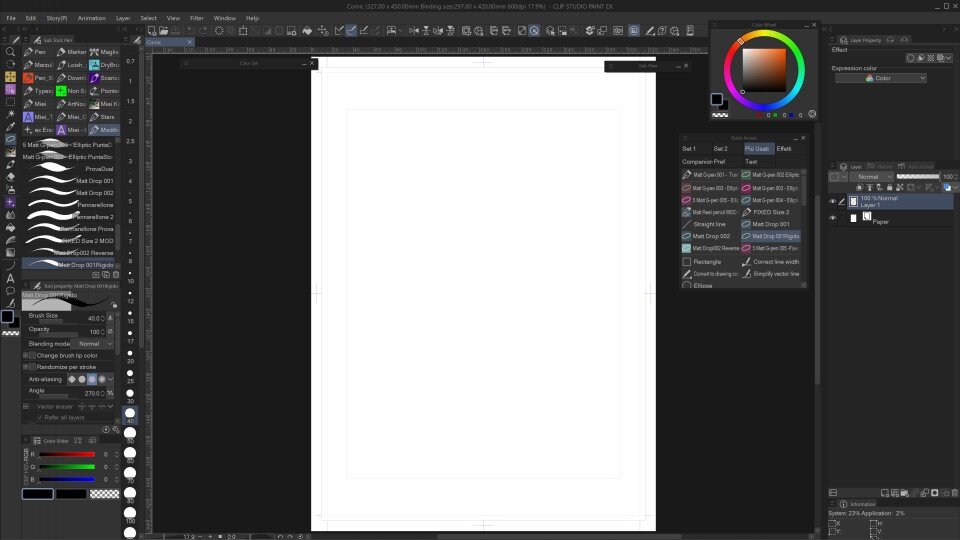
Fig. 2 - One of my workspaces
There are a few differences with the default; for example, using a graphics tablet with an independent display I prefer to have the Navigator enlarged on the PC screen rather than having it (small) on the tablet; I have moved the Brush Size palette; I prefer to have the Layer palette's Command bar below the layers and not above and I have also put the Information window under there; I have changed the colour display; etc.
You can also save your workspace and make it available to other CSP users (or to yourself, on another machine...): you save the workspace as a material from Window > Workspace > Register workspace as material and then publish it on the Assets. From the Assets you can then download and install it on another CSP.
Canvas
The Canvas is where you physically go to draw, the white rectangle of "paper" that constitutes the document.
Canvas window
This is the window that contains the Canvas (Fig. 1). Since you can have several Canvas windows open, above them is the Canvas switching tab, where you can quickly switch from one window to another simply by touching the label of the Canvas you are interested in.
Title bar e Menu bar
At the top of the programme screen are two bars, which run the full width of the window: the Title bar and the Menu bar:

Fig. 3 - Title e Menu bar
- the Title bar contains some information about the file being processed (name, canvas size, page size, resolution and zoom level), the version of CSP in use (PRO or EX) and the classic Minimize, Maximize and Close buttons;
- the Menu bar is similar to those found in almost all programmes, i.e. a series of drop-down menus containing the programme commands.
By clicking the Shift + Tab key combination several times in succession, first the Title bar disappears, then the Menu bar disappears, and finally both reappear.
Command bar
The Command bar, the set of icons above the Canvas (Fig. 1) that give direct access to certain commands, is also customisable.
To add or remove commands to the Command bar, go to File > Command Bar Settings... or right-click on the Command Bar and select Command Bar Settings...
For example, to add buttons for horizontal and vertical flips of the view (similar to those found in the Navigator), go down to View > Rotate/Invert and choose the two buttons.
Select the chosen command and click Add, or drag it onto the bar, wherever you want.
My current Command bar (I have divided it into two rows, otherwise the icons come out too small):

Fig. 4 - My current Command bar
From the first row and from left, the commands:
New; Open; Save|Undo; Redo|Delete; Delete Outside Selection; Scale/Rotate; Deselect; Invert selected area; Show border of selected area; Show selection launcher|Fill|Reset Display|Snap to Ruler; Snap to Special Ruler; Snap to Grid; Toggle special ruler snapping|Show/hide title bar and menu bar|Flip Horizontal; Flip Vertical; Flip Detail Horizontal*; Flip Detail Vertical*|Execute/Cancel quick mask; Pen Pressure Settings|Export in .jpg (JPEG); Export in .png (PNG)|Show/Hide all palette; Display Quick Access Palette|Layer selection|Convert to Selection Layer; Convert Selection Layer to Selection|Duplicate Layer; Merge with layer below|Open CLIP STUDIO|Show color wheel palette|Convert to drawing color|CLIP STUDIO PAINT support; Preferences; Connect to smartphone.
* These icons do not exist in the programme, I customised them. If you want to use them you can download them here. If you don't know how to put them in the programme, I will explain the procedure in a future article.
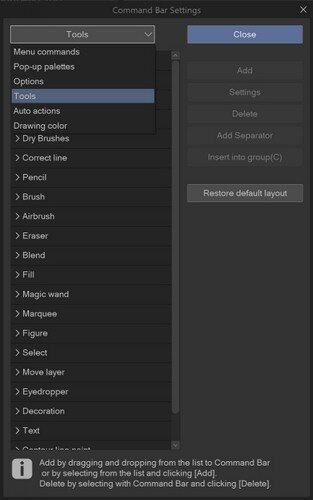
You can also add subtools to the Command Bar: that's what I did by adding the Select layer command (formerly Layer selection, as it continues to be called in my CSP), which I find very useful for figuring out which layer a part of the drawing is on without having to scroll through them all. After activating the Command Bar Settings window, I chose Tools from the drop-down menu, scrolled down to Select (in my CSP, perhaps it's Operation normally) and dragged the command onto the Command bar.
I put the Open Clip Studio button and the Duplicate Layer on the Command bar; I moved the Colour wheel, putting its icon on the Command bar by selecting it from Command Bar Settings > Window > Colour Wheel and making it float.
Fig.5 - Command Bar Settings

Tool palette
On the left-hand side of the interface, placed vertically, is the Tool palette (Fig.6), i.e. CSP's toolbox; this is perhaps the palette that is used the most, especially when you do not yet prefer to group tools elsewhere (but then again...). In this column are grouped, by type of function, the most frequently used CSP tools: this is where you go to browse brushes, activate the selection tool, choose balloons, etc.
Sub Tool palette and Tool property palette
Immediately to the right of the Tool palette I find two other palettes, which are essentially its extensions, the areas where I go to refine my choice of tool: the Sub Tool palette and the Tool property palette (see Fig. 1).
In the Sub Tool palette you choose, among various tools grouped by function affinity, the one that suits you best: a G-pen or Calligraphy brush, a light pencil or a technique, a fill, a balloon or a text.
In the Tool property palette you can go and modify the parameters that characterise the chosen tool, so you can set a certain response to pen pressure or the opacity of the stroke; the thickness of a vignette or the radius of curvature of its corners, and so on.
 Colour icons
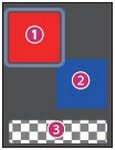
At the bottom of the Tool palette are the colour icons (Fig. 7). There are three of them, the Main colour (1 - Main colour), the Sub colour (2 - Sub colour) and the Transparent colour (3 - Transparency).
When using CSP, if you press the button several times:
X = alternate between Main colour (Main colour, 1) and Sub colour (Sub colour, 2);
C = alternate between Transparent colour (Transparent colour, 3) and the one between Main and Sub colour that was previously selected.
Fig. 7 - Icone colore
(from Manual)
Fig. 6 -
Tool palette
---
© Copyright Matteo Paolelli
0
reviews