With this article, I begin a series of in-depth discussions on the use of Clip Studio Paint (CSP).
Although I'll start with the basics, i.e. how to set the size of a new document, I won't necessarily follow an ascending order of complexity of topics in the future; I may go from one post to the next, depending on the time I have to write an article or on my mood 🤪. However, I hope to be able to touch on all the topics I know most about (which can also be found in my notes here). The reference version of the programme is EX (1.13.0, December 2022, but what is written is also fine for earlier versions, as long as they are not very old); the operating system is Windows 11.
Creating a new document in Clip Studio Paint
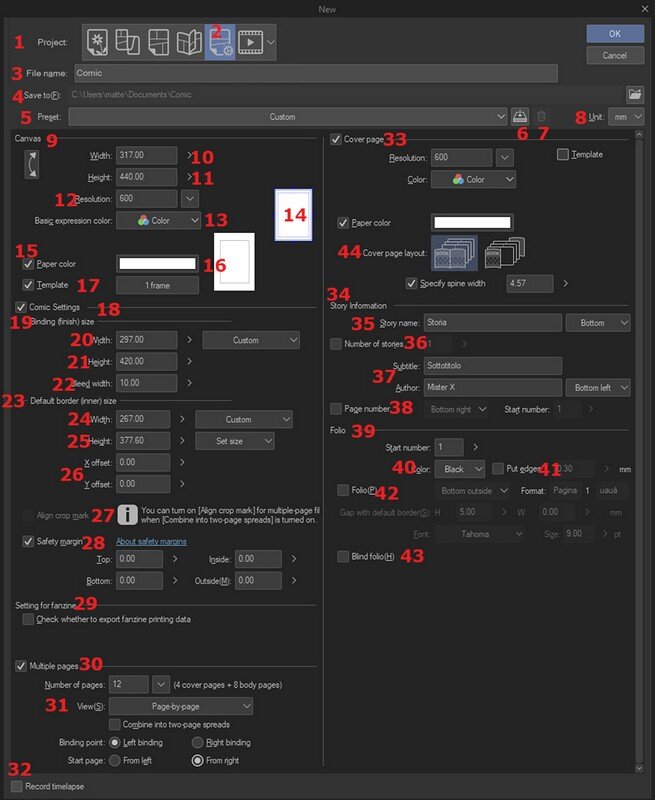
To create a new document, go to File > New; the following window opens:
Attention, this image is a composition of several images; in reality the options are not all visible at the same time
I choose the document type with one of the six boxes in Project (at number 1). The possible document types are: Illustration, Webtoon, Comic, Printing of Fanzine, Show all comics settings, Animation. Except Animation, which has its own characteristics, the other options are similar and represent special cases of the Show all comics settings option (no. 2), which I prefer.
I can give the file a name (3; by default the programme enters Comic). At No. 4 you can indicate the path where to save (Save to; click on the folder icon at its side): this space appears if you create a multi-page file (Multiple pages, tick 30), otherwise the path is decided when saving.
When creating a new document, I can either choose a set of dimensions proposed by the programme in the Presets (5) or set my own dimensions. This is very useful because the programme does not propose all the existing options: for example, it does not have A3 among the presets; it does not have the page templates of the various publishing houses; or it simply proposes templates that we may use, but with some differences (for example, I may prefer, if I am working on an A3, that the maximum size of the sheet is actually A3, and not A3 plus the other space that CSP thinks I might need). Please note: each Use of work has its own presets, either original or added. If I save a custom preset in Show all comics settings and then, for another job, I decide to use Comic as Use of work, I won't find that preset among the options but will have to recreate it.
Let's see what values to set (remember to set the measurement unit in mm in the top right-hand corner, 8):
Canvas (9): the size of the actual work area on which I draw, as if it were a large piece of paper; continuing with the A3 analogy, it is not the size of A3 (297x420 mm), but A3 plus a frame, as if the canvas of a painting were larger than the one I need (width and height, 10 and 11) for a painting; you can set the Resolution (12) of the document and whether it will be colour, greyscale or black and white (13). By ticking the Paper colour (15) checkbox, you can choose a colour other than white for the pages.
By ticking the Template checkbox, you can set a cage template from the various available in the materials library (the Materials, I will probably dedicate an article to this later). In the case of a multi-page document, this template will be applied to all pages. The templates, once on the Canvas, can also be modified.
Comic settings (18) [formerly Manga draft settings] : the sheet size, Binding (finish) size, and page layout, Default border (inner) size, are set here.
- Binding (finish) size (19), contains:
- Width (20) and Height (21) of the usable area, e.g. the dimensions of the A3 sheet (297.00 x 420.00 mm); I will refer to these dimensions with Binding later; - the Bleed width value (22), i.e. a margin of a few mm (proposed by the programme, but modifiable), outside the sheet size, on which one may continue drawing and which represents the uncertainty in the final typographical cut of the pages; - Default border (inner) size (23): this is the size of the "layout", i.e. the size of the vignettes; it depends on how much margin you want to leave between the vignettes and the page border (24 and 25).
From the box next to the width you can choose from various proposed sizes or custom sizes (Custom option): just type in the desired measurements. There is another box next to Height, which is set to Set size by default. The other possible option is Set margin: by selecting it, instead of setting the layout size, you can set how far away from the Binding each of its sides should be (Top, Bottom, Inside, Outside, with Inside being the binding side). With X offset and Y offset (26) you can offset the layout horizontally and vertically on the Canvas.
Pay attention when setting the various custom values, it seems like you are doing the right thing but often when you give the OK the result is not what you expected.
The best thing to do is to set the Binding first, i.e. the size of the sheet (in our case the A3, 297x420mm). If the 5mm Bleed is OK, leave it, if not, modify it. Then set the Default border (inner) size, i.e. the size of the layout, which will be smaller than the size of the sheet.
At this point, if you have no particular requirements, you don't need to do anything else: CSP adds a little mm to the Binding (increased by the Bleed) and proposes dimensions for Canvas. If you opt to modify Canvas, remember that its dimensions must never be less than the dimensions of the Binding plus 2 times the Bleed (one on the left and one on the right; one above and one below).
In a nutshell, with the A3 example (297x420 mm) and with Bleed of 5 mm, Canvas will have to be at least:
297+5x2= 307 mm Width (10)
420+5x2= 430 mm Height (11)
If you set Canvas smaller, the programme gives an error message. The custom set can be saved among the presets with the small button (6) or deleted with the recycle bin (7).
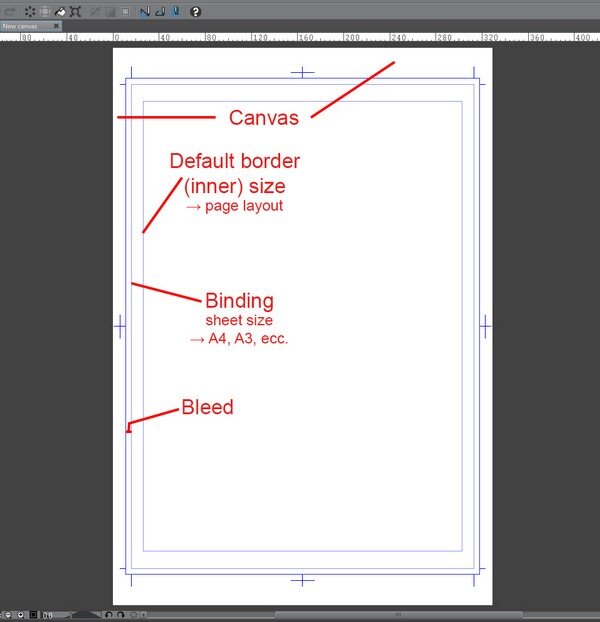
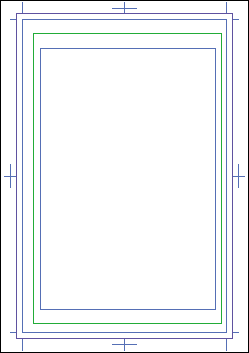
The following image shows the worksheet set with the values just seen for Default Border (inner)Size, Binding size and Bleed; Canvas has been left larger, so that the contours of all spaces can be seen:
It's better to Canvas not being the simple sum of the values just seen, because if I want to add other information to the art boards, such as those indicated in the Story Information section (a subject I will touch on in another article), these will need some space to be displayed.
You can still change these parameters after creating the document, however, by going to Story > Change basic page settings or Story > Change basic work settings.
To recap, I set in order:
Binding (the sheet: A4, A3, B4, ecc.); Bleed (cutting margin): Default border (inner) size (page layout); if needed, I adjust Canvas at the end.
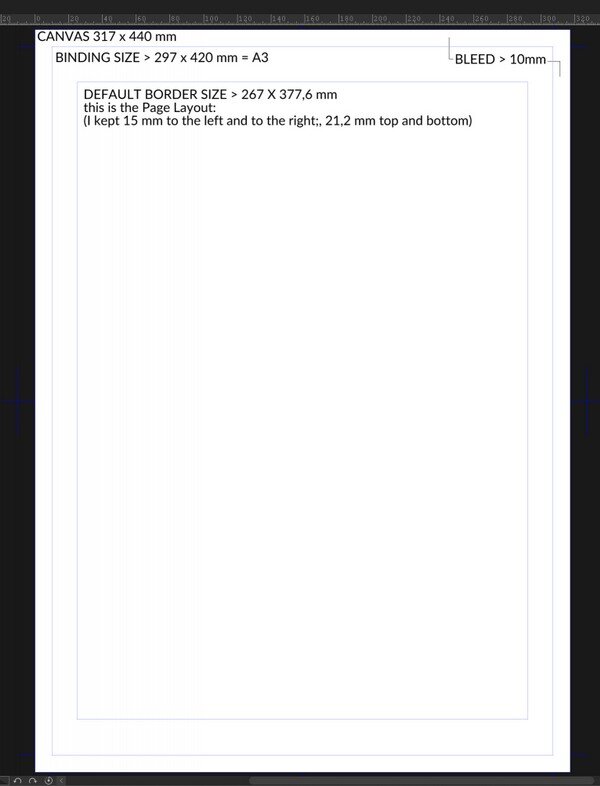
Below is another example of settings:
In this case Canvas size is equal to the Binding size plus twice the Bleed.
Bleed
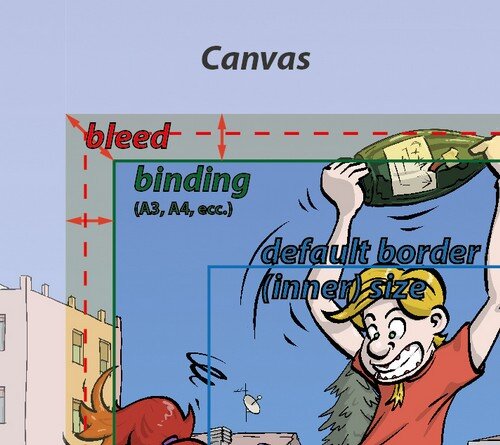
To me, this image from the Wikipedia article: this image is taken from Wikipedia:
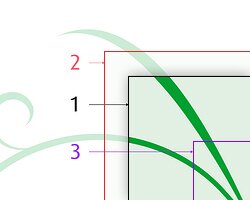
is a bit misleading; I try to redraw it:
Cutting area limits are represented here by the Bleed area, which corresponds to the area enclosed between lines 2 and 3 in the Wikipedia image. The outermost part corresponds to line 2, the innermost (binding green line) to line 3. The red hatching is the cut, which can fall anywhere in the Bleed area, and corresponds to line 1 in the Wikipedia image . Binding is the "theoretical" margin of the sheet, e.g. an A3. If Bleed cuts outside the binding, the cut line becomes the true margin. Default border (inner) size is not there in the Wikipedia image. Outside the Bleed area (i.e. in the rest of Canvas) I can continue to draw, but under no circumstances will what is present outside be present when the work is finished.
What if I have to change a project in progress?
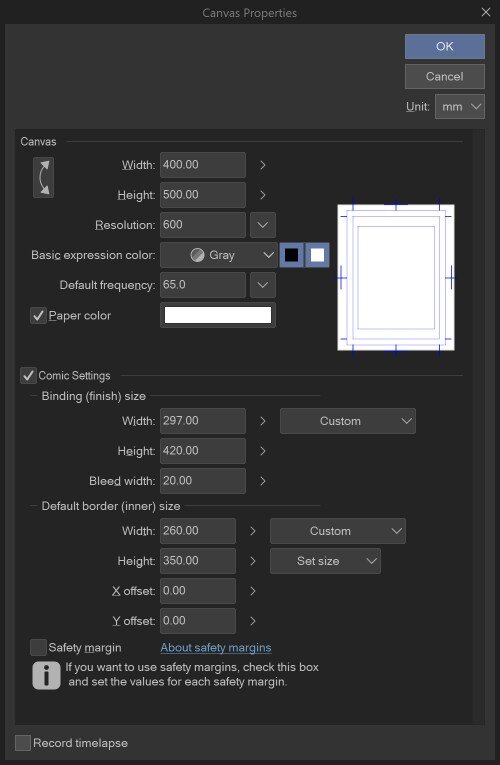
What if I have to change some parameters when I have already started working? Or worse, when my work is already well under way? You can change the parameters of the page from Edit > Canvas properties... where I find all the parameters related to dimensions (a kind of reduced New window), which I can go and modify. The observation to be careful with the sum of the page size and the Bleed remains valid: if it exceeds Canvas size, these must also be modified.
Canvas Properties
The window may appear smaller, here I have extended it to show all the parameters.
I have not tested for this particular operation, but in theory if you need to edit many pages you can start a batch process from File > Batch process..., which allows you to apply the changes to several tables at once, without having to repeat the same operations manually.
Safety margin
Since version 1.8.4 (Nov. 2018 ) there is another setting in the general sheet settings. This is the Safety margin (figure below; set in 28 in the first image above).
Safety margin, image taken from the CSP online manual.
This is a safety margin on the outside of the page layout that guarantees that what is drawn will be printed, whatever the print format that will be used, especially if you plan to print your work in different formats, in particular, that have different ratios between the sides. E.g., A3 and A4 have the same ratio between the sides (1.41...) and so switching from one to the other does not create problems, but if I also want to publish in Letter format, which has a different ratio between the sides (~1.3), the Safety margin can be useful: if I step out of the page layout, I have to remember to keep the important things (e.g. characters, dialogues) inside the Safety margin.
---
© Copyright Matteo Paolelli